Tag Archives: Doll

Blog Anniversary Presents

Wow! I want to thank everybody who commented on the blog’s anniversary post. Your kind words warmed my heart; you are why I adore being part of a blogging community. I didn’t expect anything more than your comments for the blog’s anniversary. It was a pleasant surprise when I received gifts from two awesome people to mark the occasion. I didn’t ask for it, I didn’t expect it, and I feel positively spoiled by their generosity.

The day of my blog’s anniversary, my husband surprised me with this gift. He claims that it was no small feat keeping it hidden from me over the past few weeks. I have been working towards getting the last boxes of random brick-a-brack unpacked, and he claims to have moved it several times because of my productivity. Honestly, I don’t know how I could have missed this; it is huge.

IMG_0397

This is a Barbie Bed & Bath Fold Out Doll House from 1998. It includes a bathroom and a bedroom area. It is missing the bow on the outside, but the inside is fairly complete. The canopy over the bed is missing, but there are different variations of this toy that never had a canopy. In any case, you can see pictures of a more complete model here. It certainly is a charming, even if it has some discoloring from sun damage. Thank you, my dearest, for such a thoughtful gift.

IMG_0398

The house itself opens up a whole new world of possibilities for the blog. I can repaint this and make it into any number of backdrops! It could be the Tardis. It could be any number of houses featured in the show. It could be a palace or alien world. The possibilities are endless! I am going to re-watch some Doctor Who episodes with Ood in them to see if any rooms are worth recreating with this house. If nothing strikes my fancy, I will keep it in mind for future projects.

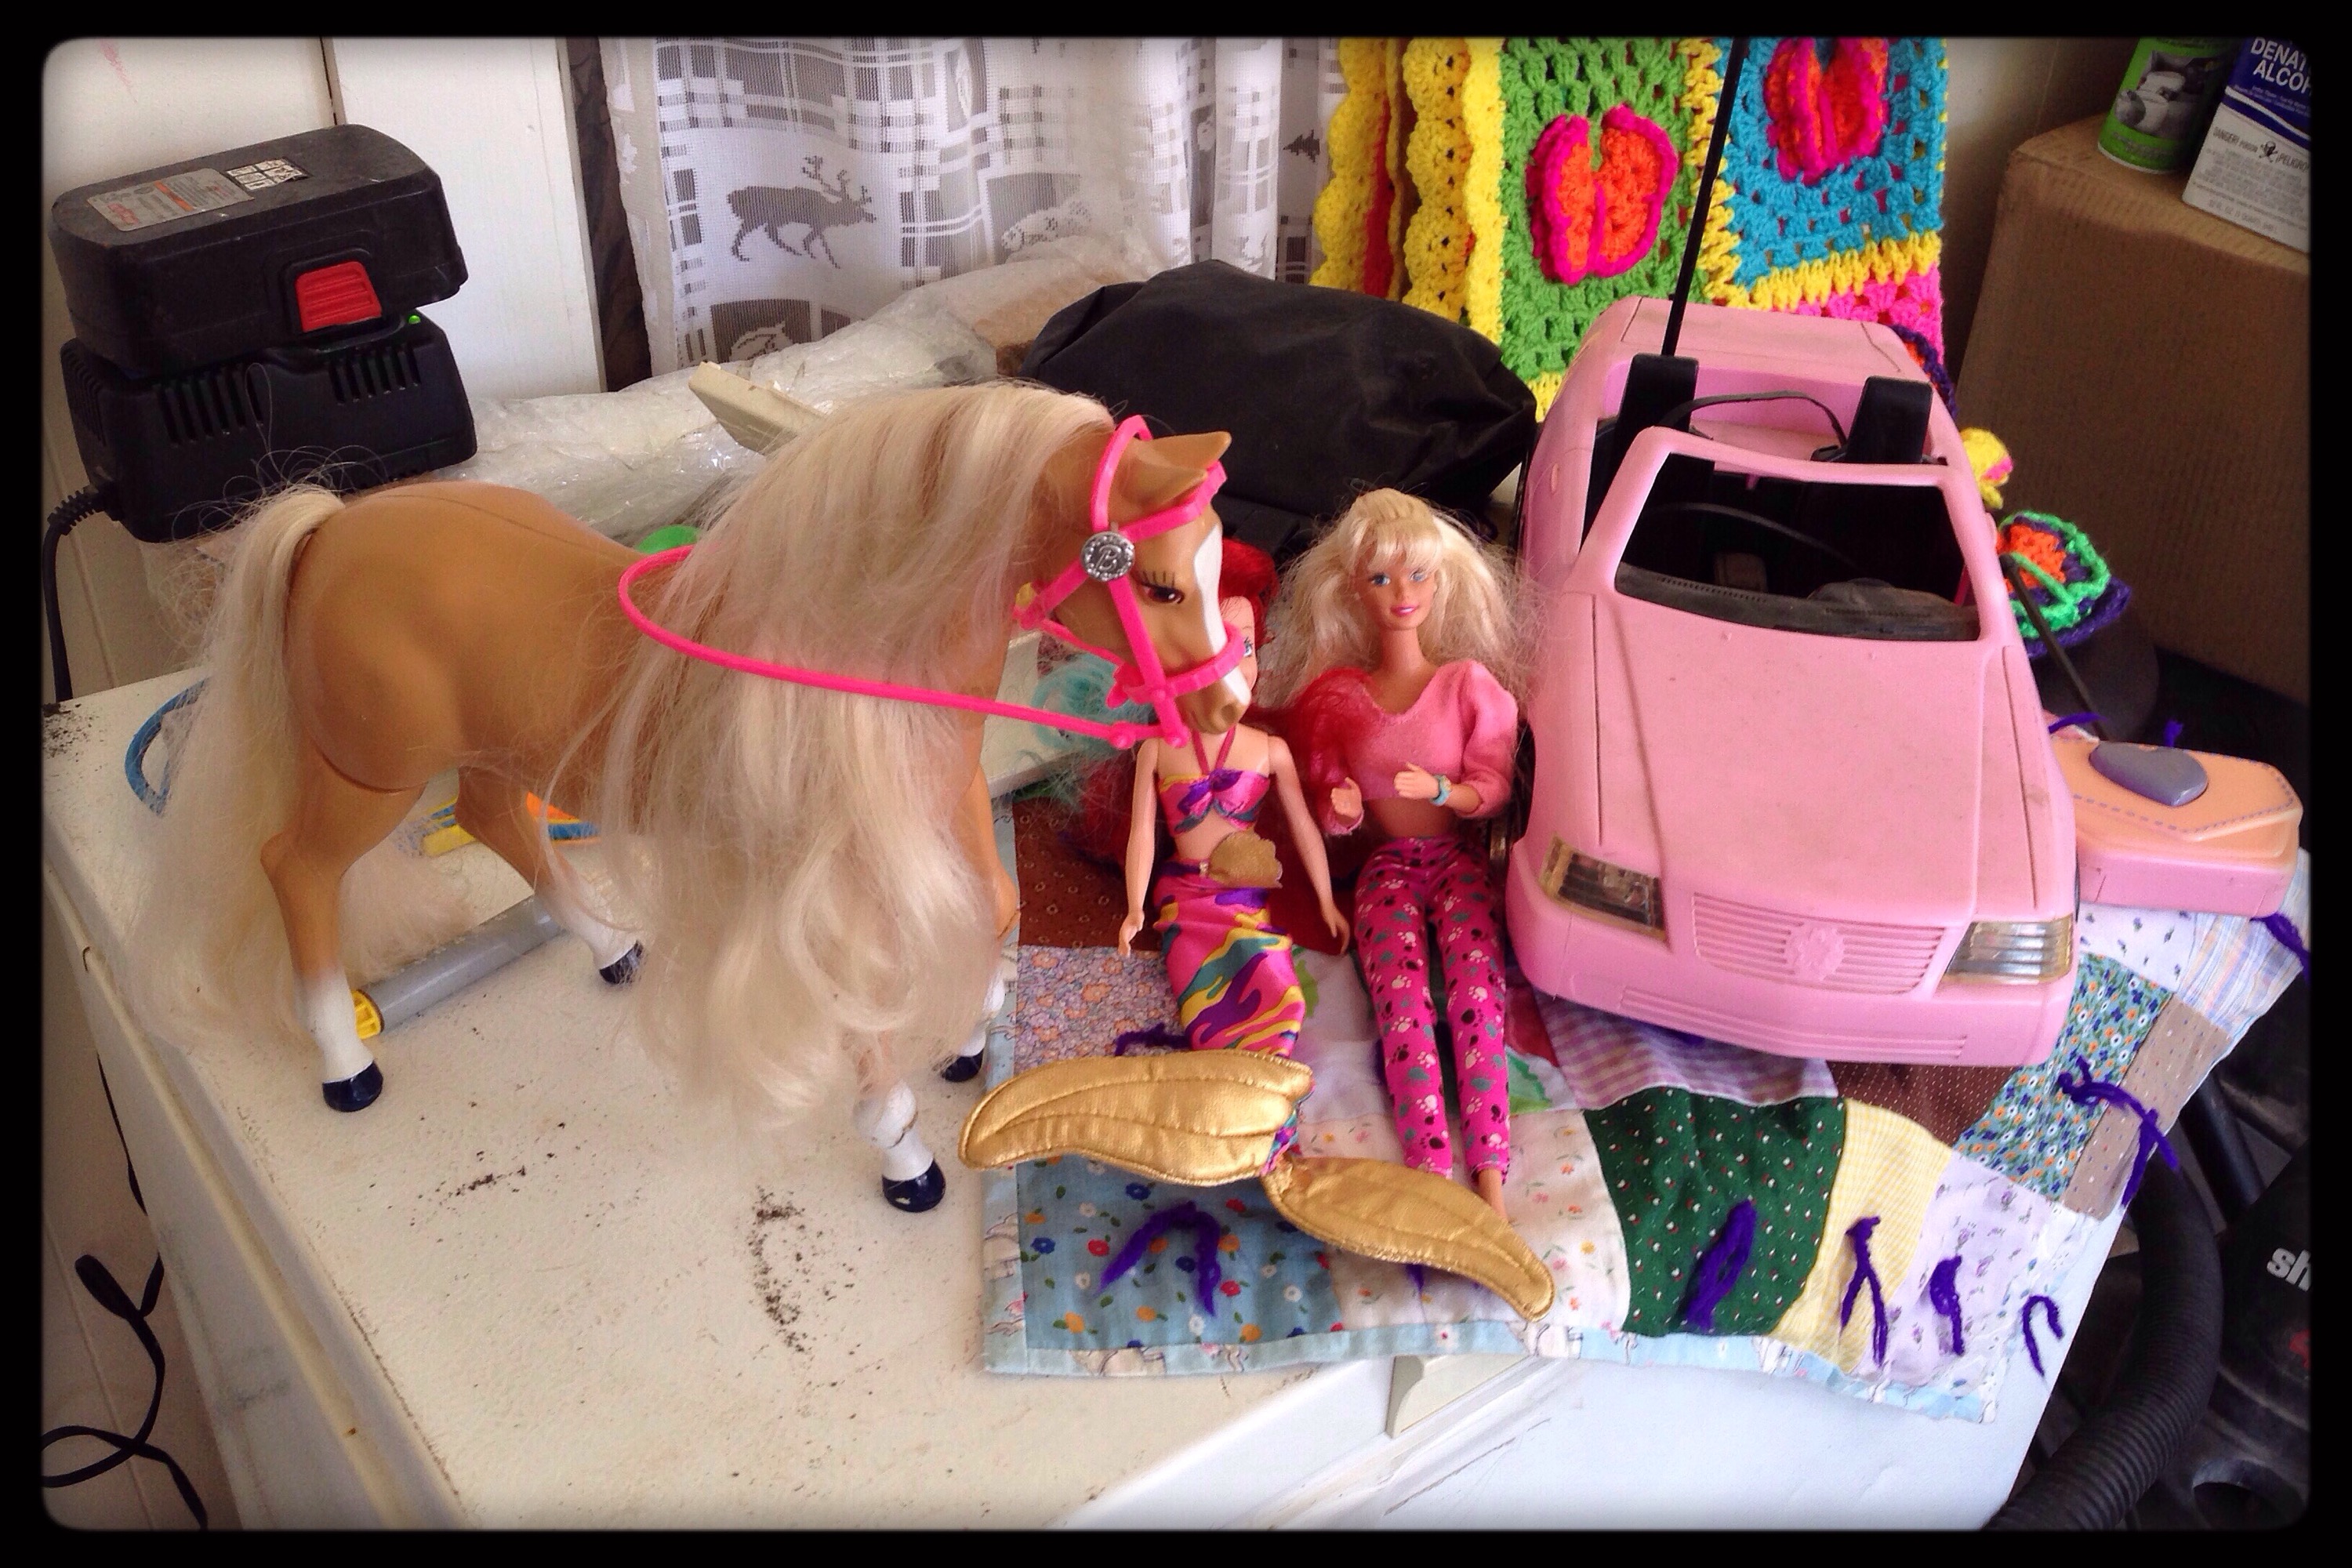
Next, I will share with you a gift from my friend Gwen. I have to start by saying nothing is more fun that getting a package in the mail that you weren’t expecting. The box arrived a few days after the blog anniversary post. The pictures aren’t the greatest because I was having lighting trouble, and I hope you can forgive me.

IMG_0349

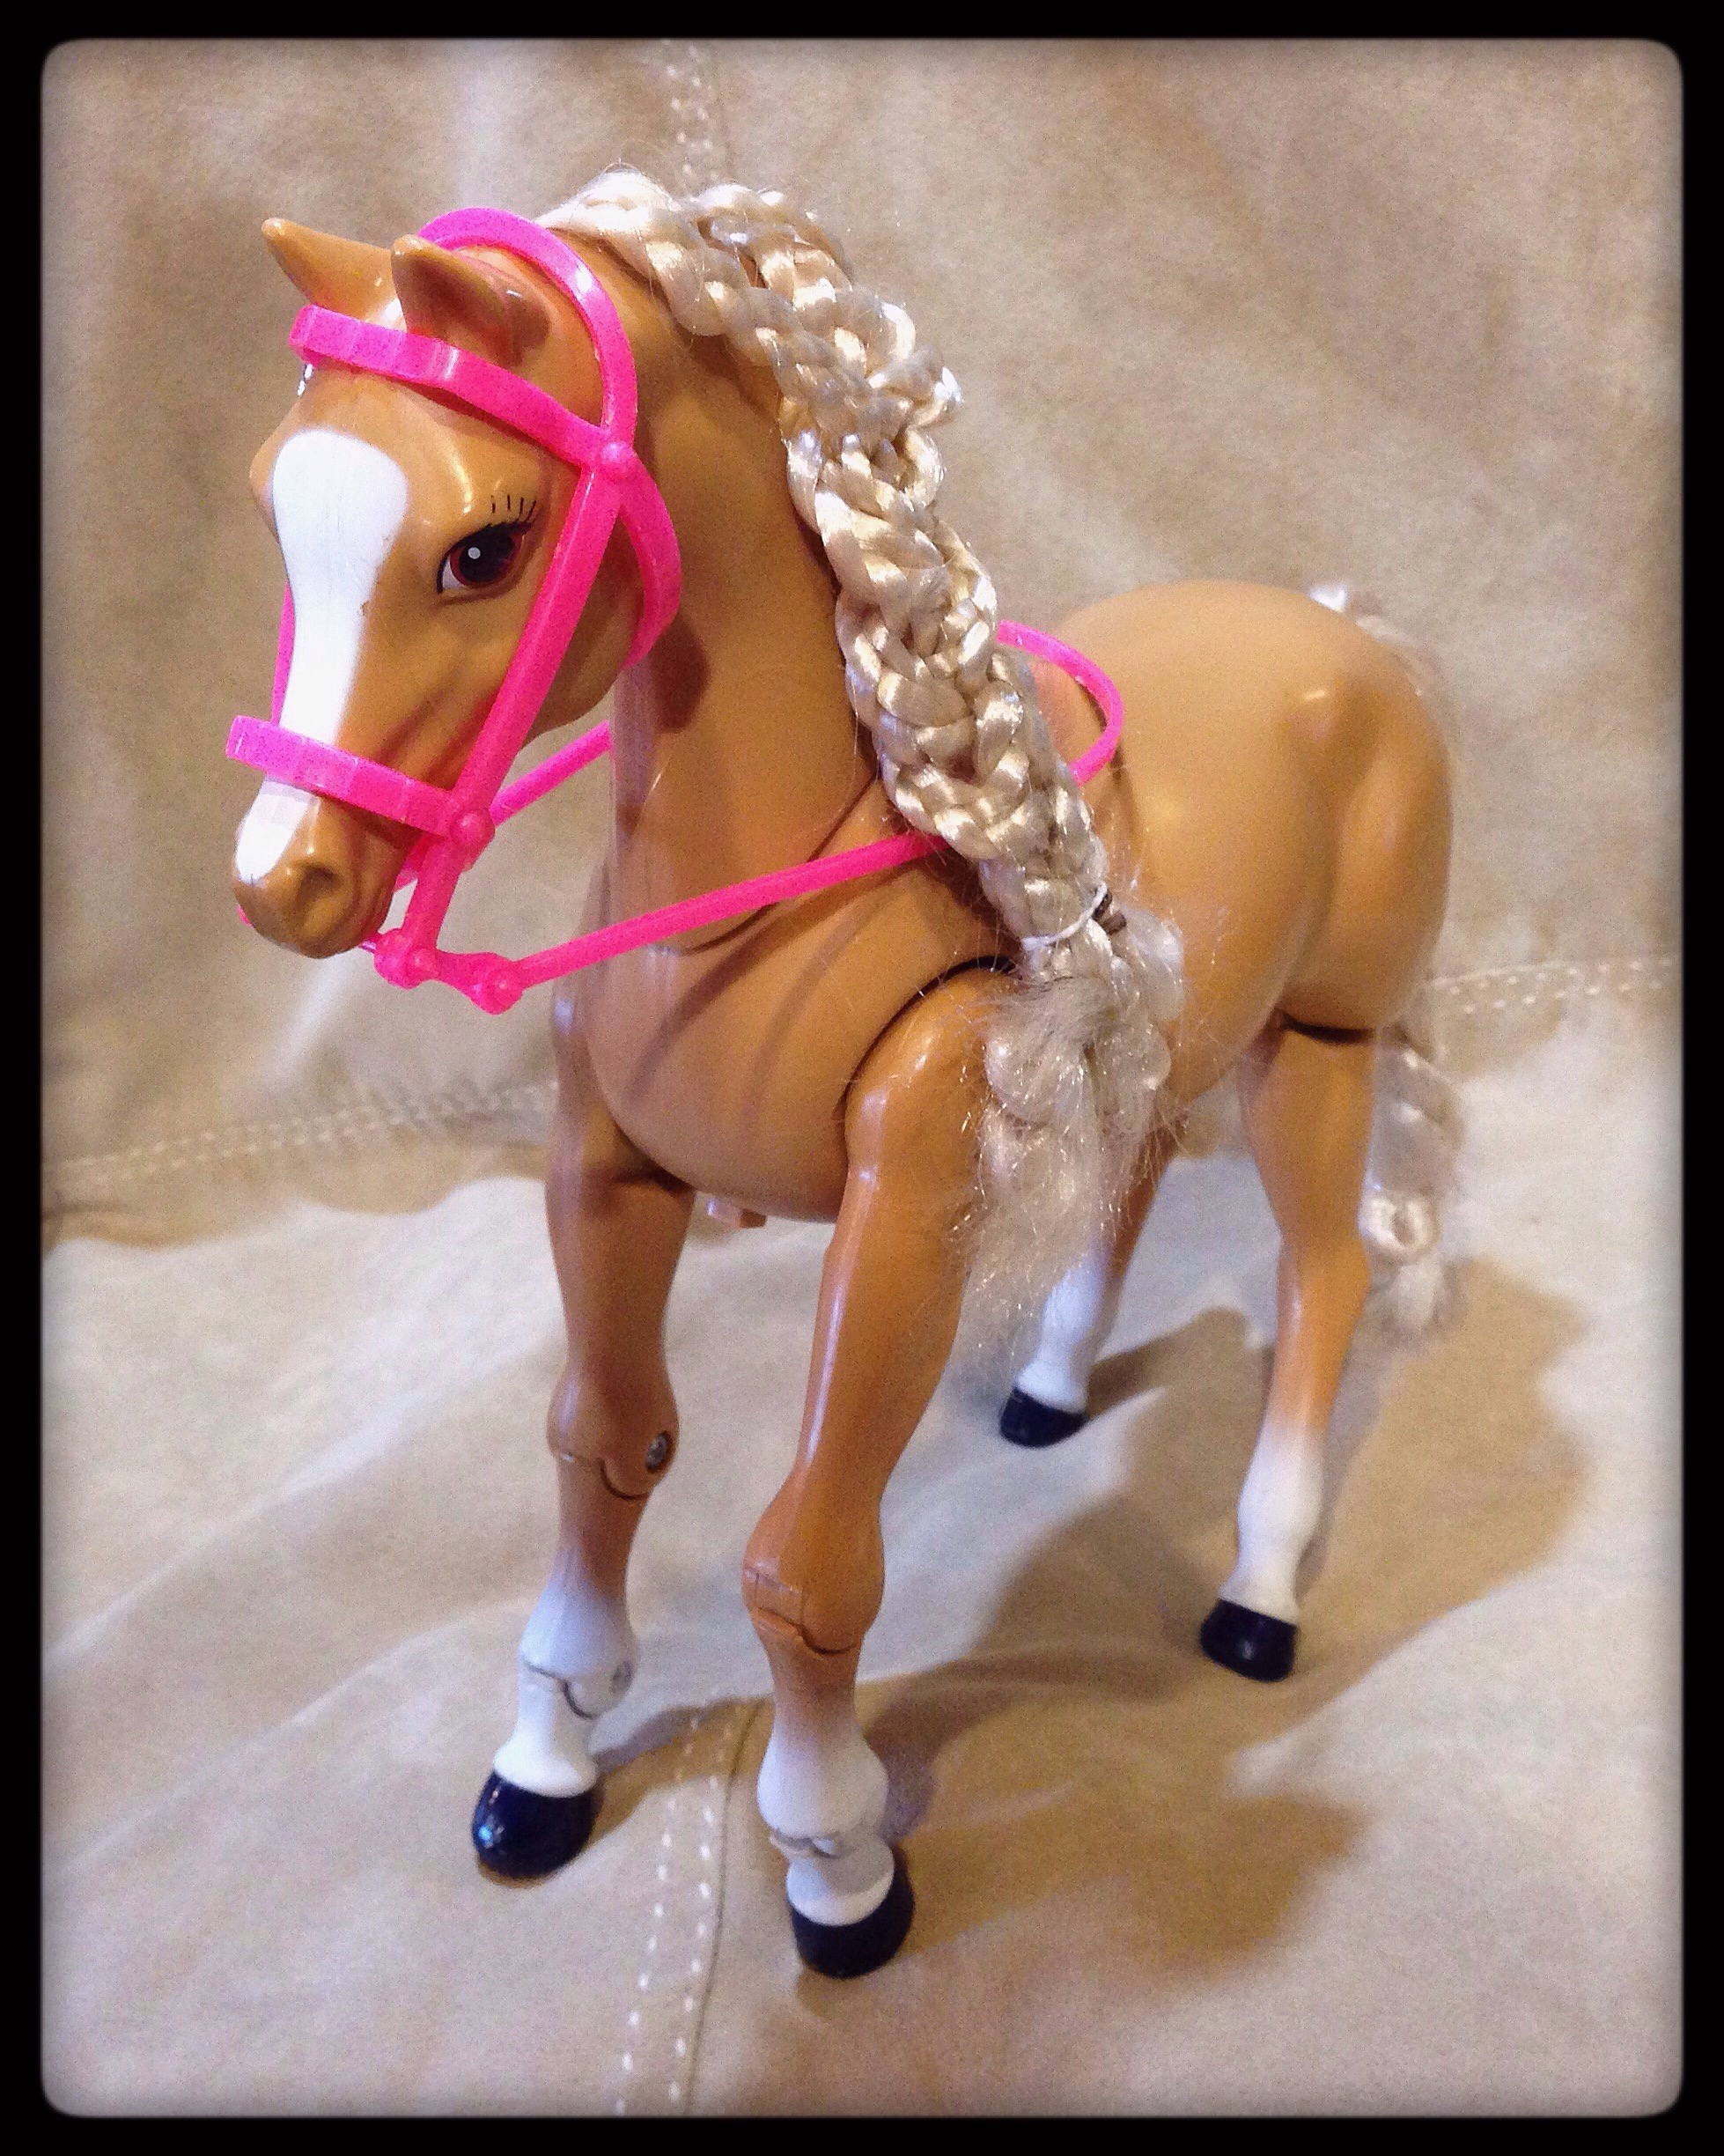
I won’t lie. I have seen this guy on shelves at various stores and I have been tempted to buy them every single time. So, so tempted…. Why? Because he looks like that one character. You know the one, I think his name was Ricky. Despite the resemblance, I never could bring myself to buy one because my budget has been too tight to splurge on a new doll. It appears that I am not the only person who saw the resemblance. Gwen included a note with this doll saying, ‘He reminded me of the plastic guy from the first episode.’ Deliciously fitting for a Ken doll.

The doll itself is called Water Play Steven or Barbie Beach Steven and he is a 2015 release. Wow! He is so modern for my collection; it’s hard to believe. I know he will need a facial repaint to truly capture the essence of Mickey Smith, so he isn’t on the short list for upcoming projects. I have a back log of projects I want to do before I dive into repainting. Still, I am glad to have this doll as part of the collection. It makes me smile to think of my plastic Mickey hanging out with the dolls. It is a delightful reminder of the season that pulled me back into Doctor Who after so many years.

IMG_0348

Who doesn’t love a good Disney prince? Well, at least when their heads are firmly on their shoulders (I’m not bitter). This is Eugene Fitzherbert from the Disney Rapunzel movie. I liked him in the movie because he is clearly more flawed than the average prince, and who doesn’t love his name? I’ve been a sucker for Genes ever since I watched Star Trek as a child. I’m getting off track! More commonly known as Flynn Rider, this doll has a nice head sculpt that captures his character. There was sticky note on him saying ‘Lose the goatee and he will look like Jack!’ I can certainly see the smoldering resemblance between the two. I think that this doll is destined to become Captain Jack Harkness, in all his glory.

The doll is a Mattel 2014 Flynn Rider doll. While I couldn’t find a review or similar for the doll itself, this post by Never Grow Up compares him to a Disney store Flynn Rider doll. I am a little bit scared because a blurb under one of the pictures says that his pants won’t come off. I…. I feel like this is the exact opposite of the Jack we all know and love. Will it be a disqualifier? Maybe. I will have to unbox him and examine him to know for sure.

IMG_0350

Now, the astute reader may wonder why I haven’t unboxed these two dolls. The answer is simple: my toddler loves unboxing. I am going to save the unboxing for a snowy (do we even get snow down here?) or rainy day when we can’t go outside, so right now they are hanging out in the front closet. I am sure they’ll strike a pose with the Ood ladies once they are free of their plastic prisons.

Speaking of Ood, I have been working on the Ood mask pattern. Something just came over me yesterday and I started making notes for version 2 of the mask. If I am lucky, I will only need two versions. I won’t know for sure if version 2 of the mask will be the final version until I crochet it and see how it fits on the dolls. My wrist is doing well enough that I tried knitting with my brace off yesterday. Yay for progress! I finished one of the gloves for the first Ood doll. With some luck, I can get the other one done and posted next week.

Also… The new sewing machine foot arrived! I chose a clear version of a 1/4″ piecing foot, and it is fantastic. I have been playing around with it by piecing together scraps of fabric; it is much easier to use than the larger 1/2″ foot. I love having a 1/4″ guide as I’m working. I plan on starting on the jacket and other aspects of the second Ood later this week! I have the fabric cut, so I just need to sit down to get the sewing done. Then comes pictures and writing and everything else…. Well, the life of a blogger is never easy. Now you know some of the cool things I have queued up for the coming weeks.

Once again, I want to say thank you for everybody who wished me a happy blog anniversary. I appreciate your kind words and the motivation you give me when I read them. Ya’ll rock! Thank you for reading and I hope you have a fantastic week.

4 Comments

Filed under Barbie Who?

Ood Shoes

Time flies when you’re having fun. It’s been a busy week. A friend of mine gardens, and we have been busy harvesting, prepping, and canning various fruits and veggies. It is exhausting work, and I am glad it only happens once per year. Even with all of that going on, I have been making time in the evenings to crochet. My wrist had a hard time with these, but I managed to get them done by doing a row or two each night. Take a peek!

IMG_9959

To create these, I used a pattern by the same people who made the pattern I used for Cofelia’s flats. This pattern is for Barbie Basic Socks and it was created by dezalyx.  Since this doll has normal feet, I didn’t have to make any major adjustments. The only change I made was in the length – their full pattern creates a knee-length sock while I stopped at more of a boot length. I considered staying true to the full original pattern, but I just didn’t see an Ood as being the type to have boots that ride that high.

IMG_9960

I think that this height is more appropriate for the overall Ood style. It also compliments the length of her pants. I went until approximately row 16 in the pattern. I didn’t do a very good job of writing down notes while making them, but I did count 16 rows on one of the shoes. If you make this pattern, make sure to put the shoe on the doll every 3-4 rows. Their legs increase in diameter surprisingly fast, and on the first sock I had to unravel a few rows and add an increase because it didn’t fit.

IMG_9961

I am excited for how well this outfit is coming together! She is really starting to look like an Ood. My next project will be her gloves. Because of my wrist problems, I expect it to take a while before I finish them. Please be patient! I promise I am doing my best, but I have this brace on for another month, and it greatly limits my range of motion. Combine that with black thread and you have a less than ideal crocheting experience. Still, I do my best! Hopefully it will be enough. Thank you for reading and I hope you have a fantastic day!

8 Comments

Filed under Barbie Who?

Happy (Belated) Birthday to Me

This post is long overdue. I meant to write this post when it was my birthday back in June, but you know how life can be. Things were chaotic, and I didn’t have a chance to finish writing about it until now. Since I sprained my wrist, I now have to take a doctor mandated break from most crafting for the next week. I plan on spending that time catching up on things! I want to get some writing done for the blog about things that happened this summer. I think this will be a fun way to pass the time until I can craft again.

My birthday is June 2. I know, I know, boring stuff. Most years I just get some warm greetings and some cards. Beyond that, it always passes by without much hooplah at all. This year was different; my friend Gwen surprised me and came for a visit! Gwen and I have been friends since we were at university together. We are both science nerds, and we hit it off swimmingly years ago. We have managed to keep our friendship alive despite the distance between us. Gwen drove 8 hours to visit me while I was staying with family. It was the best possible thing for me to see Gwen and have her support at that time. On top of that, she didn’t come empty-handed. She brought a few small gifts with her. Gwen has been supportive of my blog from the beginning. She has also been an amazing friend to me over the years. After the death of my Aunt Marie, I was in a slump when it came to blogging. Gwen helped get me back into the groove of things again. Thank you for being my cheerleader!

Gwen’s first gift was a Midge doll. Gwen said she found this doll at a flea market and had to get it for me because of her hair. Gwen thought that the doll would make a great Amy Pond. I have to agree. This girl is lovely, don’t you think?

IMG_0085

This doll rang a bell in my mind the moment I saw it. Then I remembered that Crochet with Cindy has this doll! She uses it to model some of her creations! Here is a link to a post where her Midge is modeling a lovely outfit. From the time I saw her on Cindy’s blog, I thought it looked like Amy Pond. Seeing it in person has confirmed that feeling. The doll is known as Palm Beach Midge and she was released in 2001. Most collectors agree that it is a travesty for a doll with such a pretty face to be on a body with painted clothes.  I feel similarly, but her freckles makes me forgive the swimsuit. The necklace is another story – I find it even more annoying than the clothes because it is harder to cover up. I am going to use this doll for Pond. There is absolutely no doubt in my mind that she will be a perfect fit with that character.  I haven’t decided on what outfit(s) I will create for her, but you can bet it will be something that will do justice to them both.

She also gave me another doll. This doll is vintage and positively stunning.

IMG_0084

I love Barbie dolls that are older than me. There is something charming about the dolls made in the 50’s, 60’s, and 70’s. They can also be deceiving. The first time I saw a vintage doll, I thought it was a cheap Barbie knock-off from the dollar store because the plastic was different than I was used to seeing. Luckily, I took a closer look and realized that she was a real Barbie doll. This is the blog post from that adventure.

This doll appears to be even older than my first vintage doll. She is Sunset Malibu Barbie, a doll that was released from 1971 to 1977. My Vintage Barbie has an informative blog post about her. This specific doll was an earlier model made in 1971 or 1972. Her butt marking says ‘© 1966… Made in Japan’. Production of this doll started in Japan, but it left that country in 1972 to move production to Taiwan. Later runs were made in Korea as well, so you can get a fairly accurate idea of when the doll was made by looking at the country of origin.

IMG_0083

Considering she is a decade older than me, she is in great condition! She doesn’t have any major flaws on her face and her body doesn’t have any bites or scratches. I like how the painting of her lips, eyebrows, and teeth haven’t chipped away. It really brings out her personality. I also like her orange dress. I wasn’t able to find anything online to indicate weather this is a Barbie dress or something homemade. The dress does have a bit of fraying, but it is in better shape than most of the doll clothes I’ve come across since starting the blog. Overall, she is an amazing gift that I will cherish. She has a special place among the dolls I own.

Gwen’s next gift was a stunning Barbie astronaut suit.

IMG_8004

I generally keep my eye on the Barbie aisle in stores, but I have never seen this outfit. Isn’t is adorable? This is the Barbie Careers Astronaut Fashion Pack from 2014. It has the outfit, a pair of boots, and an awesome helmet. It seems to be lacking gloves, but I’m okay with that. Doll gloves can be fickle and easily lost.

For this, is there really any question as to what episode I have to tie it into? I have to turn it into one of the skeleton astronauts from Silence in the Library. It would involve a fairly extensive repaint, so I will have to keep my eyes open for the perfect doll to use for this project. I’m sure that one will pop up before too long.

Gwen’s final gift is something I have pictured in the blog a few times before. Stands!!

IMG_0082

She gave me doll stands! How cool is that? This is something that has made picturing the dolls much easier. I can’t believe I went so long without them. Gwen gave me five stands, but one of them walked away (I suspect the cat and toddler). I have considered getting stands in the past, but I never would remember them when I was browsing eBay. Luckily, Gwen saw my need and said it was no big deal. These stands make it much easier to pose dolls and create dynamic scenes. I am really excited about the possibilities they open up. Thank you so much, Gwen, for such a thoughtful gift!

I am very lucky to have good friends in my life, and I am even luckier to know that they support me. Gwen has been a great support for me and has gone above and beyond anything I could have ever asked of her. Above all of that, she gave me a promise. Gwen said that she would keep an eye out for dolls and other Barbie things that strike her as Whovian. She isn’t as big a fan of Doctor Who as I am, but her judgment is solid (just look at that Pond doll!). I hate to rat her out, but I don’t think she’s seen series 8. The blasphemy! Still, I trust that she’ll find some wacky stuff by the next time we meet up. Gwen lives in a more metropolitan area, so it will be interesting to see what she can find. I’m sure the things she acquires will be different from what I can find in our small new town. Thank you, Gwen, for everything. You rock!

Beyond these cool new acquisitions, we hit an absolutely fantastic milestone yesterday! 100 followers of the Barbie Who? blog! I am blown away that 100 people want to go on this journey with me. You all inspire me and help keep me motivated. Thank you for following my blog and being so supportive over the last few months. I can’t thank you enough. You guys rock!

In my life, things are going well. My wrist is slowly improving, and I even finished one of the Ood shoes. I couldn’t work on it for more than a few rows at a time, but those rows add up after a few days. Also, I am still waiting for the new sewing machine foot. For some reason, the postal service decided to send it to the wrong hub. I am hopeful it will be here before the weekend. Then I can start on the sewn Ood jacket! That will be fun. In the mean time, I am looking for a glove pattern and making a strategy for the Ood hindbrain. I have seen several different ways that people made knit/crochet brains, but none of them look like they will scale well do miniature size. I will keep looking and make my own interpretation if needed. That is enough rambling for one day! I look forward to everything ahead, and I hope you have a fantastic day.

14 Comments

Filed under Barbie Who?

Ood Pants, Take 4

It has begun! I have sewn my first garments for fashion dolls. It has been quite a journey. Sewing for dolls was different than anything I have sewn before. I am excited to tell you all about the terrifying lows, the dizzying highs, and the creamy middles.

All sewing adventures start with choosing a pattern. I decided to use pattern G from Simplicity 1242. I was drawn to this pattern because it was simple and vintage; I absolutely adore vintage style. After browsing the instructions, I realized it was a straightforward pattern. It only required two leg pieces and some elastic for construction. After rummaging through a bin of fabric scraps, I assembled everything I needed for this journey.

I began by unfolding the thin pattern paper. This is always the most nerve-wracking part for me. With a toddler at my legs, you never know when an arm will reach up and try to rip what I’m working with. Luckily, she was more interested in her blocks than what I was doing up above. Once I had found the pattern I needed, I used white copy paper to trace the pattern. I didn’t want to cut out the original because I am certain I will be making this pattern again. I don’t like to cut original patterns, and doll clothes are small enough that I can get away with this little cheat.

IMG_9953

Next, I ironed out a piece of scrap fabric. It was part of a fat quarter I had leftover from making a drawstring bag. I believe the fabric is 100% cotton, and it is somewhat thin. I figured it would be a good fabric to test this pattern. First, I folded the fabric over so that it had two layers. Then, I cut out the pattern twice. I wanted to make at least two pairs of pants just in case one had problems or the sewing machine decided to eat the fabric (I love my new machine, but it did that twice when I was making curtains – eek!). The first piece I cut out was exact to the pattern. The second pair had an added 1/4″ in the waist area. Bloggers Brie and barbielea suggested adding extra space in the waist to better fit modern dolls, and I figured I should listen to their experience. Once the fabric was cut, I made my way to the sewing machine.

Before I started sewing, I read the directions that came with the pattern. They were composed of two blocks of text and two pictures; they certainly didn’t spell things out to the level I prefer. Being the visual person I am, I relied way too much on the pictures when assembling the first pair of pants. The first few steps went well. I sewed the front seam, pressed and sewed the top seam, and inserted the elastic without incident. Next, I looked at the second picture where it illustrates how to stitch the leg seams. I stitched up both legs, and then I went back to the back seam and crotch. That is when I realized my mistake. Because I waited to stitch up the back, it was hard to get the fabric to sit properly. The crotch area was particularly wonky. I read the written instructions again, and I was supposed to stitch the back seam before I stitched up the legs. Oops! I made the most of it, and when I was finished it wasn’t too noticeable on the outside. The seam is uneven when you look closely, but you can’t tell anything is wrong when the doll is wearing the pants.

Once I had the pants sewn up, I realized I had made another mistake. The bottom of the pants had a raw seam! I forgot to fold over the fabric and hem the cuffs at the bottom (where the feet come out). I looked at the instructions and I didn’t see it in the written part or in the picture. Maybe patterns expect us to know to do those things? Maybe I can’t read? Maybe I’m a total noob? I’m not sure; it is probably a combination of all three possibilities. To fix this, I rolled the fabric into the pants and pressed it with the iron. Then, I hand-stitched the hem into place. It was tedious work, but I finished it quickly due to the small size of the piece.

IMG_9954

This first pair looks pretty good, all things considered. This was my first attempt at making doll clothes, my first time sewing with a 1/4″ seam, and my first time using this pattern. Even with the mistakes I made, the pants fit my Ood doll! It was a bit difficult to slide them over her hips, but it wasn’t impossible. The bigger challenge was making her giant feet fit through the bottom cuffs. Even with those small problems, I am very happy with how the pants turned out.

IMG_9955

Because the first pair of pants were a success, I decided to do something fun with the second pair. I used a decorative flower stitch on the bottom cuffs to make them more interesting. Decorative stitches are a big advantage to having a computerized sewing machine; I wanted to utilize that capability. It didn’t take long to thread the machine and sew it into the cloth.

IMG_9956

Before I started construction on this pair of pants, I made sure to re-read the instructions. Between what was written and what I remembered from the first pair of pants, they came together beautifully. The final seam was much easier to sew, and I didn’t have to hand-stitch anything. I am very happy with how it turned out, and I am stunned at how little time it took to make them once I knew what I was doing. It would take me over a week to knit or crochet a pair of pants, and I was able to make two of these in a little over an hour. Huzzah!

I decided to let Snow White wear these trousers. The pink detailing seems to fit her style better than it does for the Ood dolls. I also couldn’t get them to fit the Ood dolls. The first pair of pants had extra fabric in the waste. The smaller waist works great for dolls with a teenage body, but it was too small for modern Barbie dolls. Old patterns are fun! I guess I will plan on making at least two of anything I sew so that I can adjust them accordingly.

IMG_9957

One big problem I felt with both pieces involved the feet on my sewing machine. None of the feet that came with my machine sew a 1/4″ seam well. The feet are all better suited for a 1/2″ or larger seam, and I found myself sewing blindly on all the curves. It was easier to sew the straight area of the leg because I could guide the fabric on both sides of the foot. On every curve, I was afraid that I would sew myself out of the fabric or I would sew too far into the fabric. I don’t like gambling, so I had to find a solution. After doing a quick search online, I found a sewing foot that is designed for assembling doll clothes. I ordered it off of eBay, and I am waiting patiently for it to make it to our home. I have decided not to sew any more doll clothes until I receive the new foot. I want to make a jacket or shirt when it does arrive. I have enough scrap black fabric to make at least one shirt, and I don’t want to ruin it by using the wrong foot.

One of the jackets included in this packet of patterns may work as an Ood jacket, after a few modifications. It is pattern E from Simplicity 1242. My only hesitation is that it looks a bit too long for an Ood. There are a few other jacket and shirt options in the other Simplicity patterns I bought. I will compare them before I make a final decision. We shall see what I come up with!

IMG_9958

I think I can say that one Ood will have a knit outfit while the second has a sewn outfit. I have also been playing around with a few other ways that I can differentiate them. Eye color is the first thing that comes to mind, but I have a few other ideas, too. What they hold in their hand is another way to differentiate them. One will have a hindbrain while the other has a translation orb. Before I hurt my wrist, I was playing around with different ways of making the translation orb. For now, I am stuck just looking for brain patterns online so that I can get a feel for how other people approach constructing a brain. Thus far, none of the patterns look like they can easily scale down to Barbie size, so I may be making my own pattern for that, too. Stay tuned!

What is next? Well, my wrist is still on hiatus. I am doing some exercises to help build up strength, but I get pain and cramps whenever I try to knit or crochet. The way I have to bend my wrist is putting too much stress on it. I don’t want this injury to linger, but at the same time I have a lot of things I want to craft. I am trying to do one row for the Ood shoes every night just so that I can make some iota of progress. If I keep that up, the next Ood update might be the Ood shoes for the first doll. For now, I am going to focus on writing a few more posts about our summer and the cool Barbie things we found while visiting family. Thank you for reading about my first sewing adventure! I hope you have a fantastic day.

10 Comments

Filed under Barbie Who?

It Came From the Basement

This is the second installment in a series I lovingly call ‘stuff we found at grandma’s house’. These items were a total surprise to me. It all started when we noticed a rotten smell coming into the bathroom. At first, we thought one of the cats had hidden a dead animal somewhere in the area. After an extensive search and thorough cleaning, we didn’t find anything. When the smell became worse, we realized it was coming from the basement.

Nobody likes going down to the basement. My parent’s house is 120 years old, and the basement is unfinished. It has brick walls and a cement floor. There are always spiders and numerous spider webs on the stairs leading down to it. Occasionally, you will see a mouse or snake hanging out in there. It is pretty gross. Despite all of that, bad smells will make you do extreme things. We bucked up and went down to investigate.

When we went into the basement, the source of the bad smell was obvious. There was an inch of stagnant water sitting on the basement floor. It was overwhelming at first, but things improved when we used the wet-dry vac to remove the water. Because of mold and bad smell, we also had to empty everything out of the basement that we could move. Thankfully, there isn’t much down there: only emergency supplies, a hot water heater, and a few storage boxes. We moved everything onto the front porch to air out. While we were moving things around, we found this green tub filled with toys.

Long story short, the standing water in the basement didn’t come from rain. It was from a leak in the water heater. We replaced the heater, and that solved the bad smell problem. It took a lot of cleaning and a week of airing out the basement, but the moldy smell went away. The only thing left was to sort through boxes to see what had been ruined. Most of the items were salvageable, and we found some gems in the green tub filled with toys.

I was delighted to see the contents of this box. Unlike the other things we found around the house, I had no idea that my mom held onto these things. I thought these toys had been given to charity when I was a teenager, but it turns out they were tucked away in the basement for over a decade. I was delighted to take inventory, and these are the Barbie toys in the mix.

Growing up, I had two Barbie cars. One was a stretch limo and the other was this glorious beast. I remember that I received the limo for my birthday when I was 6 or 7. I was so upset because my younger cousin, Derek, sat on it and tried to ride it. I thought he was going to break it! Luckily, nothing bigger than a cat has tried to get into this car. In fact, I have fond memories of when my sister and I would harass our cat, Ariel, with it. She was a good cat who grew up with 2 rambunctious girls and all our crazy antics. It was a wonder that she ever let us pet her.

The car itself has held up well; it even still has the remote. It is somewhat faded, but the wheels move without any problems. It also cleaned up well and no longer smells like flooded basement. The car is battery powered, and I haven’t been able to get it working. My husband said he would crack it open and see if there was anything he could do to fix it. I found an eBay listing stating this is a 1993 pink Barbie convertible RC car. I wasn’t able to find anything else about this model elsewhere online. If I find anything more concrete, I will update this post.

Up next is an adorable Ariel doll. The Little Mermaid was my favorite movie growing up, and I had several dolls from the movies. This doll is a Hair Fashion Ariel doll made by Tyco in the early 90’s. She is shorter than the Ariel dolls made by Mattel, and her face looks younger. I wasn’t able to find any web pages or blog posts about this doll, but I did find this photo by PrincessMermaid. It shows a picture of the doll in her original box. Isn’t she pretty?

My Ariel doll is a bit worse for ware. She is missing a few accessories, and when I took its clothes off for cleaning I realized that her leg was broken at the joint. I am fairly sure that this break happened before I found the doll because I hadn’t tried bending any of her joints. However, I can’t rule out that some of the other people in the house handled her before I was able to start cleaning.

I don’t know if it is going to be something I can fix because of where the break is located. I am sure that I can glue it back into the joint, but I am fairly sure the glue would fill the entire socket and the doll would lose the ability to pivot in that area. With her tail on, it isn’t a big problem. The leg stays up and can bend into different positions, so I am keeping it as-is for now. This vintage Ariel doll is just hanging out with the other Disney princess dolls for now.

The other doll in the box is a veterinarian Barbie. Growing up, I loved animals and I insisted on having the veterinarian Barbie doll. She was released in 1996 and is called Pet Doctor Barbie. If memory serves, I received her as a birthday gift from my mother. I remember that she came with a cat, a dog, and a basket that made noise. While we seem to have lost a few pieces from the original set, her outfit is surprisingly intact. She has the matching shirt and pants. I don’t entirely understand why a veterinarian would wear a cropped off shirt, but then again it was the 90’s and Mattel did some pretty crazy stuff with some of their dolls. This Barbie even has her watch! Can you believe that such a small piece stuck around for so long? It would have been cool if she had her stethoscope, but I wasn’t that lucky. I am excited to have her to pass on to my daughter. I hope that she loves animals as much as I do and enjoys this doll as much as I did.

This Barbie doll and the Ariel doll didn’t lose the basement smell from airing out alone. These two dolls smelled terrible for longer than anything else we found. They smelled the worst out of everything in the box when we first found them, but I managed to solve that problem. First, I cleaned them and their outfits with dish soap and let them air dry. While I was cleaning Barbie, her pink plastic hair band disintegrated. The plastic was old and I think it had hardened with age. I picked out all the bits of pink plastic from her hair and, once the hair was dry, I replaced it with a brown plastic band. Cleaning with soap wasn’t quite enough to remove the smell, so I soaked both dolls in a mixture of 1 part vinegar to 3 parts water overnight. Then I let them air dry on the front porch. I repeated the soaking three times before the smell was completely gone. I like using vinegar. The slight acidity of the solution killed any microbes that were living on the dolls. The vinegar solution didn’t discolor the skin or hair of either doll or their clothes. It took some effort, but I am happy that I was able to salvage both dolls.

This next find is something special. It is my walking Barbie horse. I received this horse for either my birthday or Christmas in the 90’s. I remember how delighted I was by her and her ability to walk. I also remember how much our cat disliked her and would attack her when she was walking on the kitchen floor. Luckily, she was cured of basement smell with just a scrub down and airing out on the front porch for two weeks. Her hair was a bit worse for ware, but I’ve seen worse. To fix her hair, I combed it out and gave it a hot-water dip. That managed to tame it enough for me to braid it with my friend, Gwen. I did the tail and she did the mane. We were like little girls again, sitting on the living room floor braiding a doll horse’s hair. It was fantastic.

This horse can walk! Luckily, her internal electronics are still intact and running. This makes me extremely happy, and it brings great joy to all of us to see my toddler running after it. As far as identification, I wasn’t able to find an exact match for this horse online. I believe it was just called ‘stepping horse’ or ‘walking horse’ because I don’t remember the name Tawney at all. I can see that the horses released over the last decade or so all seem to be named Tawney. I was able to find several horse gifts sets that were released in the 90’s, but none of them rang a bell to me. I remember that my horse came with a bridal, a saddle, and some pendants for her hair all in matching pink. I was able to find a similar set, but all of the horse’s accessories were in red. Oh well! You can’t win ’em all. For now, her exact identity will have to be a bit of a mystery.

The craziest part about this horse is that I bought another horse exactly like her from a flea market nearly a year ago. I bought the flea-market horse because it reminded me of the Barbie horse I had as a child. I am just blown away that we were able to find that original horse after all these years. Now that we’re home, I managed to find the second horse and I braided her hair, too.

I need 4 more Barbie horses and we can reenact the Kentucky Derby. If I can find them, I will make sure to make outlandish hats and dresses for the dolls in attendance. Anything less would be improper.

The final item I will share with you today is a doll quilt. This quilt was made for my by my paternal grandmother when I was a little girl. I don’t remember when I received it, but I am fairly sure that all the grandkids got a small quilt for Christmas that year. This quilt is too large for a Barbie doll; it was made to wrap a baby doll into when playing. I adore it! It makes me want to dabble in quilting. I have considered making a pot holder or a Barbie sized blanket. We shall see how my other sewing exploits go before I commit to a big quilting project.

I’m not sure if or how I will incorporate these into Barbie Who?, but I thought it was fun to share this unexpected blast from my past. Currently, I am grounded from knitting and crochet because of an injured wrist. I was in a car wreck, and the steering wheel was none too kind to my body. I am trying to spend the down time writing on the blog and doing some sewing. Sewing is more of a chore because of the wrist brace, but I am confident I can adapt. Depending on my ambition, the next update will probably be a sewn garment for the second Ood doll. If not, it will be another tidbit from our summer back home. Until then, cheers!

2 Comments

Filed under Barbie Who?

Ood Jacket

Horray! Another Ood Update! I finally finished the Ood jacket, and I am very pleased with how it turned out. While part of me will miss her floral shirt, I am happy with how this doll is coming together.
A knit jacket made for an Ood doll

This jacket is made with size 10 crochet thread and size 0 (2.00 mm) knitting needles. The pattern I used for this jacket is from the Sticka till Barbie website, pattern number 913. I would rate this pattern for intermediate knitters. It didn’t have anything crazy, but it wasn’t easy either. For me, the hardest part was picking up stitches for the sleeves. It was difficult to do this with such fine thread. In all honesty, I had never picked up stitches before this pattern, so I had to look up a few tutorials on YouTube in order to get an idea of how it worked. After failing to do it with the knitting needles several times, I wound up using a small crochet needle to do the work. It was awkward to work with a knitting and crochet needle at the same time, but I managed to make it work.

Beyond that, I had a bit of drama that set me back at least a week on this piece. I found some black crochet thread at a thrift store. I was excited for it, I thought it was a great buy, and I was incredibly naive. About halfway through the back of the jacket, I realized that this thread had problems. It would break when you tugged on it. This is something I have never seen in thread before. Just a light tug and poof! It would be broken. I learned this when the toddler grabbed and yanked the thread as I was working on it and it made a meter long length of string fray badly. Then, I took the thread and gave it a light tug. It broke clean-through. I unraveled part of the ball and tried it again; same problem. I am completely stunned and upset. I had at least 4 hours worth of knitting into the piece when I realized the yarn had this problem. I checked the rest of my cache to make sure that none of the other skeins have this flaw. Luckily, it was only this odd-ball black thread. Overall, I am happy I realized this problem sooner rather than later – I would have hated to finish the jacket and have it fall apart when my girl is playing with it down the road.
an Ood doll with yarn and knitting needles

After the yarn problem came to light, I had to buy a new skein of black crochet thread. This was the biggest time sink for this project; I forgot it the first time I went shopping and didn’t have time to go again until a week later. I went to a Hobby Lobby since they were having a sale on thread that week, and I bought a new skein of Artiste brand size 10 cotton crochet thread. The color is coal black, and it does not disappoint. It didn’t snap when I tugged on it, and it matched the color of the previous skein. This stuff will is well suited for doll clothes. Fabulous! As a side note, I am so glad to be living somewhere with more than one craft store. Our old small town had a family owned craft store and the city (an hour away) had a Hobby Lobby, but this area has Hobby Lobby, JoAnn Fabric, Hancock Fabric, and Michaels. I am amazed by the sales and coupons that I now get to use.

Beyond that, the only other eventful thing to happen while knitting this piece was with the toddler. She managed to get into my craft cubby and ran off with the knitting needles. Luckily, the stitches came off cleanly and I was able to get them back on a needle without having to re-knit any rows. Even if it had been worse, it happened within the first few rows of the final sleeve and wouldn’t have been hard to restart the sleeve if she had done more damage.A Barbie doll wrarinf an Ood mask and outfit.

This Ood is almost complete! I have to make her hindbrain, shoes, and gloves before she will be complete. I think I will tackle her shoes next because I have a crochet pattern in mind to create them. I am also going to begin work on sewn pieces for the other Ood doll. It should be interesting to see how sewing goes. I am not accustomed to 1/4″ seams, so it will be a new experience. Fingers crossed that it will go smoothly. Thank you for reading and I hope you have a fantastic day!

6 Comments

Filed under Barbie Who?

A New Frontier: Sewing

Wow, what a summer it has been for us. As I have said before, my family recently moved south. Moving is always a challenge, and there are always casualties along the way. This time around, my sewing machine was the biggest loss. It was a Europro I had bought at a thrift store. I think I spent $25 for it and another $35 to have it serviced and a part replaced. The people at the repair shop said it was a fairly new machine and would have cost $350 if I had bought it from their shop. I rolled the dice and would up winning with this thrift store find. It was a solid machine and it served me well for many years; I was sad to see it go. The movers did pack it well, but the box it was packed in was crushed under something heavier. This caused some bending of the case and some of the machinery inside. It made a terrible crunching sound after I powered it back up, and it was at that moment I knew it was beyond repair.

The moving company paid out a little over $100 for the value of the machine. Isn’t it fun how insurance works? It pays for how much they think the item is worth and not how much it would cost to replace it. While I certainly got my money’s worth out of the machine, I was shocked by the various options and prices for a replacement. Do I want to spend $1,000 for a good quilting machine? Do I want to thrift a new machine and roll the dice again? What brand do I want? Mechanical or computerized? Where will I get the best deal? There were so many considerations.

I didn’t take this decision lightly. I researched different types of machines, different brands, and other factors. I decided that I didn’t do enough sewing to buy an extravagant machine. I didn’t want to spend a large amount of money on an expensive new machine because we will likely be moving several more times during the lifetime of the machine (it’s just a reality of my husband’s career). I wanted something that meets somewhere between quality and affordability. I narrowed it down to a few machines I was interested in, and then I went to a local sewing shop.

The lady at the shop was very nice. She showed me several machines and gave her opinion on them. I told her my needs, and she said that a Brother machine would probably be best for my needs as an occasional seamstress. She showed me several models, and in the end I spent $150 on a Brother CS-6000i. This model has been out for several years, and it seems reliable. It has so many positive reviews; people seem to enjoy it. The lady at the shop said that she often sells this as a starter machine because it travels well (for going to and from sewing classes) and it can do a little bit of everything. She said she wouldn’t recommend making a large quilt on it, but it can do smaller projects. This fits me very well. I was impressed with the various feet and accessories it came with, too. I have used exactly 2 of them, but it’s nice to know they’re there if I ever need them. I saw a beautiful quilted pot holder on Ericka Eckles’ blog, and I would love to tackle that type of project with this machine. I am currently making drapes for our new home, and I hope to use scraps from that project to attempt a potholder of my own. We shall see how it goes!

IMG_9744

Over the last few weeks, I have used the machine for some minor hemming and curtains. It is a nice machine, and I look forward to using it in my home and beyond. One thing I learned from chatting up other bloggers is that you can buy sewing patterns for 11-1/2″ fashion dolls. I looked online, and I made a short list of the different patterns currently offered by the main pattern manufacturers. Then I waited. I have been around craft stores long enough to know that most patterns will go on sale for $1-$2 every few weeks, so it is just a matter of time for them to become affordable. Last week, my luck struck! Hancock Fabrics had a 5 for $5 sale on Simplicity patterns, so I went there to stock up! It was my first time at their store, and I was happy with the experience. I was able to pick up all the patterns I wanted at an excellent price.

IMG_9743

Simplicity 1242 (MSRP $18.95)
Simplicity 5785 (MSRP $13.95)
Simplicity 4702 (MSRP $14.95)
Simplicity 4719 (MSRP $14.95)
Simplicity 1955 (MSRP $16.95)
Simplicity S0734/1234 (MSRP $16.95)

That is a total MSRP of $96.70, and I paid $6.00 for them all. That is a 94% savings. I feel like a savings ninja! Pattern sales truly are the only way to buy patterns. I don’t see how any seamstress could afford them otherwise.

As of right now, I plan on using the pants and jacket from Simplicity 1242 for the second Ood outfit. I think that it would be interesting to have two outfits that are stylistically the same but made from two different mediums. It should also be much faster to sew an outfit than it is to knit an outfit, too. This will help me finish the Ood dolls and move on to something else. Right now, I feel like a wedding is calling me. I have many patterns from my mom that could apply to a wedding scene…. It is so, so tempting. I’ll try not to get too far ahead of myself, though. I need to focus on one character and one outfit at a time.

Currently, I am making solid progress on the knit Ood jacket. I hope to have it finished this week! With some luck, I should have it posted next week. I am excited for how it looks, but I also know that I am about to tackle the hardest part of the pattern. Hopefully the sleeves and the neck area will go smoothly. I look forward to sharing the next update. Until then, I hope you have a fantastic day.

8 Comments

Filed under Barbie Who?, Shopping

Straight-Leg Pants Pattern

This pattern is designed for a belly-button typed 11.5″ Barbie doll, but it also fits the older narrow-hipped dolls fairly well. It should fit most of the different Barbie doll body types if you take care when knitting the top half of the pants and cast off with enough slack.

IMG_9241

Supplies:

– Size 10 Crochet Thread
– Size 0 (2.00 mm) Knitting Needles
– Size 0 (2.00 mm) Cable Holder OR an extrea Size 0 (2.00 mm) Knitting Needle

Here are a few notes before you begin:
– This pattern can be modified for length – you can easily subtract rows for a better fit for a Skipper or Disney doll.
– Slip the first stitch of every row for a nicer edge that sews together better than a rough non-slip stitched edge.
– k2p2 is optional as you cast off; I didn’t notice a big difference in the finished product between only knitting the cast off row and alternating that row between knits and purls to match the previous rows.

Abbreviations:
P – Purl Stitch
K – Knit Stitch
k2p2 – two knit stitches followed by two purl stitches; repeat this pattern through the end of the row
p2k2 – two purl stitches followed by two knit stitches; repeat this pattern through the end of the row
Stockinette Stitch – A technique where you knit one row and pearl the next row to make a smooth piece of fabric
K2tog – Knit 2 stitches together

– Leg (Make 2) –

Row 1: Cast on 28 stitches

Rows 2-71: Stockinette stitch (knit one row, purl the next) for 70 rows, beginning with a knit row (28 stitches)

Row 72: Cast off 2, knit remaining row (26 stitches)

Row 73: Cast off 2, purl remaining row (24 stitches)

Row 74: Cast off 1, knit remaining row (23 stitches)

Row 75: Cast off 1, purl remaining row (22 stitches)

DO NOT cast off – once this leg is finished, place it on a cable holder or set the needle aside while you stitch the second leg
DO cut the thread and leave a tail on the first leg so that your thread is available to work on the second leg – the second leg does not require the thread to be cut – you can move on to create the top without cutting the thread on the second leg

– Top –

Row 76: Knit 21 on the second leg, join the final stitch of the second leg with the first stitch of the first leg with a k2tog, knit 21 on the first leg (make sure that you keep the right and wrong sides of the fabric on each leg facing the same direction – the fabric created by stockinette stitch has a front and a back and it will not look right if one is backwards) (43 stitches)

Rows 77-79: stockinette stitch for 3 rows (43 stitches)

Row 80: K10, k2tog, k8, k2tog, k9, k2tog, k10 (40 stitches)

Rows 81-85: stockinette for 5 rows (40 stitches)

Row 86: K12, k2tog, k12, k2tog, k12 (38 stitches)

Rows 87-89: stockinette for 3 rows (38 stitches)

Row 90: K11, k2tog, k12, k2tog, k11 (36 stitches)

Row 91: k2p2 (36 stitches)

Row 92: p2k2 (36 stitches)

Row 93: k2p2 (36 stitches)

Row 94: p2k2 (36 stitches)

Row 95: Cast off (do this loosely so that the top has some stretch – do not repeat my mistake)

– Finishing –

Finish the pattern by sewing the seams together. I find that it is easiest to sew the back of the top from top to bottom first, and then work your way down both legs. It is easier to work from the top down because then you won’t end up with uneven ends in the crotch area. It is much easier to regulate the stretch of the fabric as you work down the legs, and you can adjust it as needed to keep it even. The hardest part things in this pattern to sew is the crotch area, so make sure to take your time so that you don’t sew the wrong edges together. Once the pants are sewn together and you have worked in any loose ends, your doll will have a sweet new pair of slacks.

IMG_9245

That is it! Once you complete these steps, you will be in possession of a lovely pair of straight-leg Ood pants. I am happy that I was able to share this with everybody. I look forward to sharing the Ood Mask pattern with you all once it has been perfected.

This is my original pattern and protected by copyright law. These instructions may not be duplicated, distributed, or sold in any form. You are welcome to create and sell the items that you make using this pattern; I kindly ask that you link back to my blog if you do so. If you make this pattern, please let me know! I would love to see your work, and I will update the pattern as needed with the feedback given.

5 Comments

Filed under Barbie Who?, Patterns

Ood Pants, Take 3

Finally! Something Ood! This is long over-due, but I finally bit the bullet and got pictures taken of the Ood pants. I know they don’t look great because the lighting here leaves much to be desired, but I’m going to go with it for now. For the next few weeks we will just have to make due with what I have available (the joy of moving!). So, on to the pants!

IMG_9241

Where to begin with these…. It feels like I’ve been working on them for ages. Looking back at the blog, that seems painfully accurate. I remember that when I first started them, just as an experiment, I tried to make this pattern in the round with my set of metal double pointed needles (DPNs). While this technique can work with larger sized yarn, it doesn’t work well with crochet thread. The problem I ran into was that the slack between DPNs didn’t get absorbed back into the surrounding stitches as I was knitting. This caused large holes in the sides, which was not aesthetically pleasing. I suppose I will reserve that technique for larger gauge yarns and stick with the regular way of making doll pants. Because that experiment didn’t go well, I made these pants with regular single pointed needles and sewed it together at the end. I found that slipping a stitch at the end makes the edges much easier to work with. I made sure to note that in the pattern, too.

Once I got started with my regular needles, I ran into a few other problems. I finished the first leg, I set it aside, and my daughter found it. As any toddler would, she started waving the needle in the air and pulling at the string, so it was pulled entirely apart by the time I got home. This happened while her father was in charge, but it was ultimately my fault for not putting them somewhere toddler-proof. I had to start it over again after that setback because of how unevenly it had unraveled. Luckily, I didn’t have any other toddler-related incidents after that. I did have a bit of trouble when we were packing and moving, though. At one point, my work was misplaced and I feared it was in a box destined for the moving truck. Luckily, it surfaced before anything happened, but it was frustrating not having it to work on for those days.

These pants used up almost all of the black thread on its skein. I have a few yards left on it when I was finished, but I was worried about running out as I knit the second leg. Luckily, skeins of crochet thread have a deceivingly large amount of thread on them even when they look barren. On that same note, something cool happened just after I finished this garment. I was at a thrift store with my mom and she I found a skein of black yarn! Same gauge that I use for my doll clothes and only cost $1. Forget lottery tickets, my luck guides me to cool thrift store finds. It may be a little thing, but I’ll take it.

I created the pattern for these pants. I didn’t like the look of various patterns I found online because they were too form fitting, so I had to make the pattern myself to fit the Ood aesthetic. I went for a straight-leg pant that went down to the doll’s ankle. My first draft needed some tweaks, and the adjustments resulted in exactly what I wanted. The biggest changes I did was lengthening the legs and adjusting the rows around the waist. In this picture, the first draft is on the left and the finished product is on the right.

IMG_9242

Here is a link to the pattern. It is a fairly straightforward method, and I hope you enjoy it! I look forward to when I make another pair for the second Ood doll. Before I start on that, though, I am going to make the jacket for this doll. I have been browsing the Sticka till Barbie website, and I found a few promising patterns. I will try my hand at one or two of them and go from there. Once that is done, it is just a matter of making shoes, gloves, and a brain for this Ood to be complete. It seems like a lot more when I write it down. Wow.

IMG_9245

I think she is looking better every day! For me, the biggest difference came when I cut her hair so that the mask would fit better. All she needs is a proper Ood shirt and the whole look will really pull together. Keep an eye out! Next week I will talk about some of the stuff that we found in my mom’s attic. We also just found a box in the basement with some gems, but they may be ruined. Some items were in a plastic box in the basement, and the basement flooded when the water heater broke. The box is covered in mud, but everything inside is relatively clean. The items are dry and not moldy, but they smell terrible. I am going to let them sit out for a week and then I will clean them. From there, I’ll decide if they’re worth keeping or if I have to let go of a fascinating flash from my past. I’m sure I will write about it either way, so we have that going for us. Anyways…. I adore you all and hope you have a fantastic week.

2 Comments

Filed under Barbie Who?

To Give an Ood a Haircut

Ahhh! I think I fell into some type of worm hole. Or maybe I went on an adventure with the Doctor…. Because there is absolutely no way it’s been nearly a month since I’ve posted. Wow. I am so sorry that I’ve been terrible about posting lately. Moving has been kicking my butt and presented some struggles that really put me off kilter. In addition, the baby caught scarlet fever. Now, I know what you’re thinking: “Isn’t that one of those diseases from the Oregon Trail video game that people don’t get anymore?” Except they can. And we did. As you can see, I have been busy and completely lost track of time. I will do my best to be more consistent. I promise!

For today, I am going to dive into prepping the body and hair of the first Ood doll. I’ve found many dolls since beginning this project, and all of them are second-hand. As one can expect, some of them are in better condition than others. This doll has a pristine body but problems with her hair. I believe my daughter pulled out her hair, and it is very visible how much is missing behind her bangs.  Because of this, she needs an extra bit of TLC to completed her transformation. Her body needs a good scrub and she needs a haircut so that the mask will fit properly over her head. Once these changes are made, she will be a few steps closer to joining the Oodkind.

This doll has a general layer of grime on her body and a few random marks on her legs. The grime didn’t show well on the pictures I took, so you’ll just have to take my word on this one! To restore her, I used water and regular blue Dawn dish soap. Most of the work was done with a microfiber cloth, but I used a cotton swab for her face to get all the nooks and crannies. Although the transformation isn’t dramatic, it is an important step to take. A clean doll is less likely to develop stains on its plastic and it also prevents the transfer grime to the clothes I’m making for her. After letting her air dry overnight, she was ready for her haircut.

IMG_8720

As a child, I never gave my dolls haircuts. I just wasn’t that kid; it upset me deeply when anything happened to my dolls. My sister didn’t feel the same way, though. I vividly remember her cutting the hair of her dolls and blowing one up with firecrackers on the Fourth of July. Luckily, she always stayed away from my dolls. Still, I can’t help but think her actions scarred me because I had a fairly queasy feeling as I cut this doll’s hair.

My method for cutting the doll’s hair was simple. First, I combed out her hair and secured it with a plastic band near her head. Then I secured a second plastic band further down her hair.

IMG_8721

Then I made the cut!

IMG_8722

Next, I removed the plastic band and combed the hair back to a more natural position.

IMG_8723

Last, I trimmed the hair to even it out on the sides.

IMG_8724

This method is less precise than free-style cutting, but I am not overly concerned with how the haircut looks because she will be wearing a mask. I used this method instead of free-styling the scissors in order to reduce the mess caused by a haircut. The plastic band prevented the hair from going everywhere as I cut it. I did have a bit of a problem with the little hairs while trimming, but the small hairs were easily swallowed up by my handheld vacuum. The longer strands wouldn’t have gone down as easily. I suggest doing this over a garbage bin or outside if possible. I also suggest going slowly. I tried to rush, and that caused some unevenness in the back.

Now that her hair is more manageable, the mask fits over her head. I can now properly fit the prototype Ood mask over her head without her locks popping out the back. It is an awesome sight, and I feel silly for not having done this sooner.

IMG_8725

I am fairly happy with the design, but I do see a few tweaks that I’d like to make for the second mask. The fitting around the neck needs some changes to better fit her shape. Right now, the neck is too loose and the length concerns me. Overall, as a first draft, it turned out very well. Everything can be changed in the pattern for the final draft. I am very pleased with this prototype and how well it looks now that I can lace it up.

IMG_8726

That is it for today! I hope you enjoyed my rambling on about cleaning this doll and cutting her hair. I am still working on the pants. Long story short, the baby managed to ruin the nearly completed pants I had been working on all this time. She also destroyed what was left of my black crochet thread. It was heartbreaking; it takes so many hours to knit those tiny things. I bought a new skein of it last week and I’ve been diligently working on finishing the pants. I currently have one leg finished and the other one started, so it has been going fairly quickly. Hopefully I can keep the momentum up as we approach the big moving day! I can’t wait for this all to be over. Nothing makes you appreciate normal, boring life quite like moving. I want to spend my time crafting, not packing.

Beyond all of that, I am considering what footwear my Ood will wear. They appear to wear black utility boots in the episodes that I have seen, but I’m not sure if I can emulate that well. I think I will browse patterns and see what I can come up with. If I can’t find anything knit/crochet that catches my eye, I am considering dabbling into polymer clay to create the shoes I want. I’m not entirely sure that I want to take that dive, though. Clay gets messy and I don’t have the smaller shaping tools needed for the fine detailing. Plus, after the molding, it would need some paint for highlights and more detailing…. It just seems daunting. This is why I’m looking into my various options before I go down that road. I am confident that I can find something that will work, so stay tuned! I hope you all have a fantastic day.

2 Comments

Filed under Barbie Who?