Tag Archives: Pants

Ood Pants, Take 4

It has begun! I have sewn my first garments for fashion dolls. It has been quite a journey. Sewing for dolls was different than anything I have sewn before. I am excited to tell you all about the terrifying lows, the dizzying highs, and the creamy middles.

All sewing adventures start with choosing a pattern. I decided to use pattern G from Simplicity 1242. I was drawn to this pattern because it was simple and vintage; I absolutely adore vintage style. After browsing the instructions, I realized it was a straightforward pattern. It only required two leg pieces and some elastic for construction. After rummaging through a bin of fabric scraps, I assembled everything I needed for this journey.

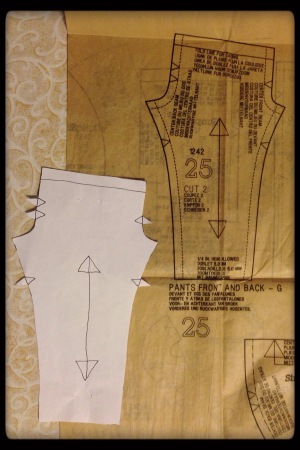
I began by unfolding the thin pattern paper. This is always the most nerve-wracking part for me. With a toddler at my legs, you never know when an arm will reach up and try to rip what I’m working with. Luckily, she was more interested in her blocks than what I was doing up above. Once I had found the pattern I needed, I used white copy paper to trace the pattern. I didn’t want to cut out the original because I am certain I will be making this pattern again. I don’t like to cut original patterns, and doll clothes are small enough that I can get away with this little cheat.

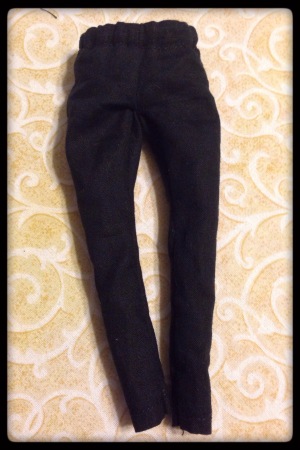
IMG_9953

Next, I ironed out a piece of scrap fabric. It was part of a fat quarter I had leftover from making a drawstring bag. I believe the fabric is 100% cotton, and it is somewhat thin. I figured it would be a good fabric to test this pattern. First, I folded the fabric over so that it had two layers. Then, I cut out the pattern twice. I wanted to make at least two pairs of pants just in case one had problems or the sewing machine decided to eat the fabric (I love my new machine, but it did that twice when I was making curtains – eek!). The first piece I cut out was exact to the pattern. The second pair had an added 1/4″ in the waist area. Bloggers Brie and barbielea suggested adding extra space in the waist to better fit modern dolls, and I figured I should listen to their experience. Once the fabric was cut, I made my way to the sewing machine.

Before I started sewing, I read the directions that came with the pattern. They were composed of two blocks of text and two pictures; they certainly didn’t spell things out to the level I prefer. Being the visual person I am, I relied way too much on the pictures when assembling the first pair of pants. The first few steps went well. I sewed the front seam, pressed and sewed the top seam, and inserted the elastic without incident. Next, I looked at the second picture where it illustrates how to stitch the leg seams. I stitched up both legs, and then I went back to the back seam and crotch. That is when I realized my mistake. Because I waited to stitch up the back, it was hard to get the fabric to sit properly. The crotch area was particularly wonky. I read the written instructions again, and I was supposed to stitch the back seam before I stitched up the legs. Oops! I made the most of it, and when I was finished it wasn’t too noticeable on the outside. The seam is uneven when you look closely, but you can’t tell anything is wrong when the doll is wearing the pants.

Once I had the pants sewn up, I realized I had made another mistake. The bottom of the pants had a raw seam! I forgot to fold over the fabric and hem the cuffs at the bottom (where the feet come out). I looked at the instructions and I didn’t see it in the written part or in the picture. Maybe patterns expect us to know to do those things? Maybe I can’t read? Maybe I’m a total noob? I’m not sure; it is probably a combination of all three possibilities. To fix this, I rolled the fabric into the pants and pressed it with the iron. Then, I hand-stitched the hem into place. It was tedious work, but I finished it quickly due to the small size of the piece.

IMG_9954

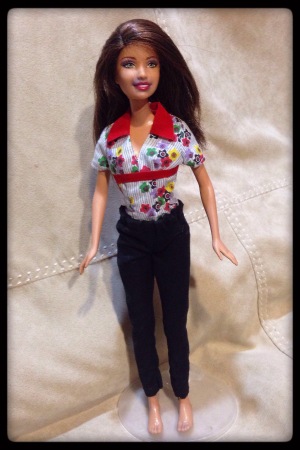
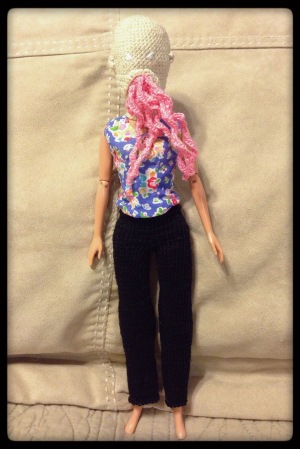
This first pair looks pretty good, all things considered. This was my first attempt at making doll clothes, my first time sewing with a 1/4″ seam, and my first time using this pattern. Even with the mistakes I made, the pants fit my Ood doll! It was a bit difficult to slide them over her hips, but it wasn’t impossible. The bigger challenge was making her giant feet fit through the bottom cuffs. Even with those small problems, I am very happy with how the pants turned out.

IMG_9955

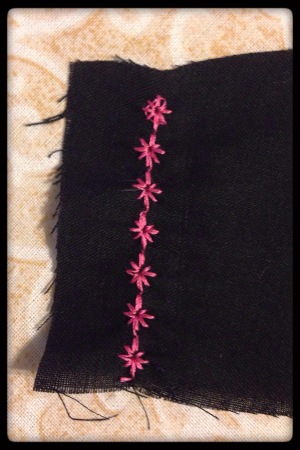
Because the first pair of pants were a success, I decided to do something fun with the second pair. I used a decorative flower stitch on the bottom cuffs to make them more interesting. Decorative stitches are a big advantage to having a computerized sewing machine; I wanted to utilize that capability. It didn’t take long to thread the machine and sew it into the cloth.

IMG_9956

Before I started construction on this pair of pants, I made sure to re-read the instructions. Between what was written and what I remembered from the first pair of pants, they came together beautifully. The final seam was much easier to sew, and I didn’t have to hand-stitch anything. I am very happy with how it turned out, and I am stunned at how little time it took to make them once I knew what I was doing. It would take me over a week to knit or crochet a pair of pants, and I was able to make two of these in a little over an hour. Huzzah!

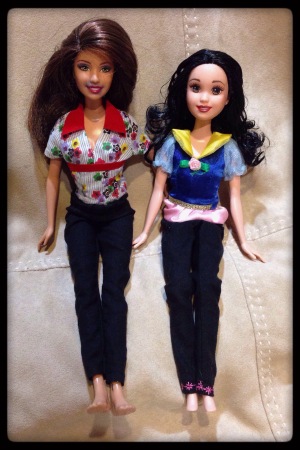
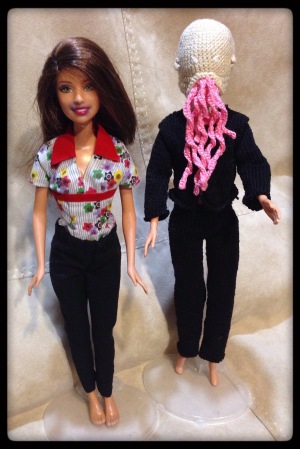
I decided to let Snow White wear these trousers. The pink detailing seems to fit her style better than it does for the Ood dolls. I also couldn’t get them to fit the Ood dolls. The first pair of pants had extra fabric in the waste. The smaller waist works great for dolls with a teenage body, but it was too small for modern Barbie dolls. Old patterns are fun! I guess I will plan on making at least two of anything I sew so that I can adjust them accordingly.

IMG_9957

One big problem I felt with both pieces involved the feet on my sewing machine. None of the feet that came with my machine sew a 1/4″ seam well. The feet are all better suited for a 1/2″ or larger seam, and I found myself sewing blindly on all the curves. It was easier to sew the straight area of the leg because I could guide the fabric on both sides of the foot. On every curve, I was afraid that I would sew myself out of the fabric or I would sew too far into the fabric. I don’t like gambling, so I had to find a solution. After doing a quick search online, I found a sewing foot that is designed for assembling doll clothes. I ordered it off of eBay, and I am waiting patiently for it to make it to our home. I have decided not to sew any more doll clothes until I receive the new foot. I want to make a jacket or shirt when it does arrive. I have enough scrap black fabric to make at least one shirt, and I don’t want to ruin it by using the wrong foot.

One of the jackets included in this packet of patterns may work as an Ood jacket, after a few modifications. It is pattern E from Simplicity 1242. My only hesitation is that it looks a bit too long for an Ood. There are a few other jacket and shirt options in the other Simplicity patterns I bought. I will compare them before I make a final decision. We shall see what I come up with!

IMG_9958

I think I can say that one Ood will have a knit outfit while the second has a sewn outfit. I have also been playing around with a few other ways that I can differentiate them. Eye color is the first thing that comes to mind, but I have a few other ideas, too. What they hold in their hand is another way to differentiate them. One will have a hindbrain while the other has a translation orb. Before I hurt my wrist, I was playing around with different ways of making the translation orb. For now, I am stuck just looking for brain patterns online so that I can get a feel for how other people approach constructing a brain. Thus far, none of the patterns look like they can easily scale down to Barbie size, so I may be making my own pattern for that, too. Stay tuned!

What is next? Well, my wrist is still on hiatus. I am doing some exercises to help build up strength, but I get pain and cramps whenever I try to knit or crochet. The way I have to bend my wrist is putting too much stress on it. I don’t want this injury to linger, but at the same time I have a lot of things I want to craft. I am trying to do one row for the Ood shoes every night just so that I can make some iota of progress. If I keep that up, the next Ood update might be the Ood shoes for the first doll. For now, I am going to focus on writing a few more posts about our summer and the cool Barbie things we found while visiting family. Thank you for reading about my first sewing adventure! I hope you have a fantastic day.

10 Comments

Filed under Barbie Who?

Straight-Leg Pants Pattern

This pattern is designed for a belly-button typed 11.5″ Barbie doll, but it also fits the older narrow-hipped dolls fairly well. It should fit most of the different Barbie doll body types if you take care when knitting the top half of the pants and cast off with enough slack.

IMG_9241

Supplies:

– Size 10 Crochet Thread
– Size 0 (2.00 mm) Knitting Needles
– Size 0 (2.00 mm) Cable Holder OR an extrea Size 0 (2.00 mm) Knitting Needle

Here are a few notes before you begin:
– This pattern can be modified for length – you can easily subtract rows for a better fit for a Skipper or Disney doll.
– Slip the first stitch of every row for a nicer edge that sews together better than a rough non-slip stitched edge.
– k2p2 is optional as you cast off; I didn’t notice a big difference in the finished product between only knitting the cast off row and alternating that row between knits and purls to match the previous rows.

Abbreviations:
P – Purl Stitch
K – Knit Stitch
k2p2 – two knit stitches followed by two purl stitches; repeat this pattern through the end of the row
p2k2 – two purl stitches followed by two knit stitches; repeat this pattern through the end of the row
Stockinette Stitch – A technique where you knit one row and pearl the next row to make a smooth piece of fabric
K2tog – Knit 2 stitches together

– Leg (Make 2) –

Row 1: Cast on 28 stitches

Rows 2-71: Stockinette stitch (knit one row, purl the next) for 70 rows, beginning with a knit row (28 stitches)

Row 72: Cast off 2, knit remaining row (26 stitches)

Row 73: Cast off 2, purl remaining row (24 stitches)

Row 74: Cast off 1, knit remaining row (23 stitches)

Row 75: Cast off 1, purl remaining row (22 stitches)

DO NOT cast off – once this leg is finished, place it on a cable holder or set the needle aside while you stitch the second leg
DO cut the thread and leave a tail on the first leg so that your thread is available to work on the second leg – the second leg does not require the thread to be cut – you can move on to create the top without cutting the thread on the second leg

– Top –

Row 76: Knit 21 on the second leg, join the final stitch of the second leg with the first stitch of the first leg with a k2tog, knit 21 on the first leg (make sure that you keep the right and wrong sides of the fabric on each leg facing the same direction – the fabric created by stockinette stitch has a front and a back and it will not look right if one is backwards) (43 stitches)

Rows 77-79: stockinette stitch for 3 rows (43 stitches)

Row 80: K10, k2tog, k8, k2tog, k9, k2tog, k10 (40 stitches)

Rows 81-85: stockinette for 5 rows (40 stitches)

Row 86: K12, k2tog, k12, k2tog, k12 (38 stitches)

Rows 87-89: stockinette for 3 rows (38 stitches)

Row 90: K11, k2tog, k12, k2tog, k11 (36 stitches)

Row 91: k2p2 (36 stitches)

Row 92: p2k2 (36 stitches)

Row 93: k2p2 (36 stitches)

Row 94: p2k2 (36 stitches)

Row 95: Cast off (do this loosely so that the top has some stretch – do not repeat my mistake)

– Finishing –

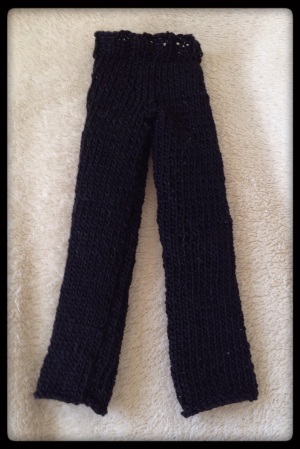
Finish the pattern by sewing the seams together. I find that it is easiest to sew the back of the top from top to bottom first, and then work your way down both legs. It is easier to work from the top down because then you won’t end up with uneven ends in the crotch area. It is much easier to regulate the stretch of the fabric as you work down the legs, and you can adjust it as needed to keep it even. The hardest part things in this pattern to sew is the crotch area, so make sure to take your time so that you don’t sew the wrong edges together. Once the pants are sewn together and you have worked in any loose ends, your doll will have a sweet new pair of slacks.

IMG_9245

That is it! Once you complete these steps, you will be in possession of a lovely pair of straight-leg Ood pants. I am happy that I was able to share this with everybody. I look forward to sharing the Ood Mask pattern with you all once it has been perfected.

This is my original pattern and protected by copyright law. These instructions may not be duplicated, distributed, or sold in any form. You are welcome to create and sell the items that you make using this pattern; I kindly ask that you link back to my blog if you do so. If you make this pattern, please let me know! I would love to see your work, and I will update the pattern as needed with the feedback given.

5 Comments

Filed under Barbie Who?, Patterns

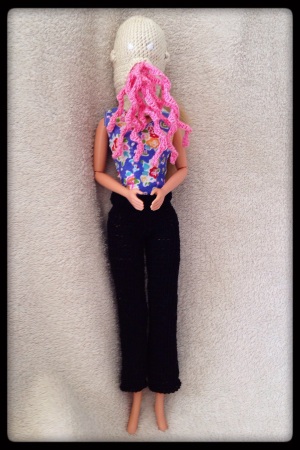
Ood Pants, Take 3

Finally! Something Ood! This is long over-due, but I finally bit the bullet and got pictures taken of the Ood pants. I know they don’t look great because the lighting here leaves much to be desired, but I’m going to go with it for now. For the next few weeks we will just have to make due with what I have available (the joy of moving!). So, on to the pants!

IMG_9241

Where to begin with these…. It feels like I’ve been working on them for ages. Looking back at the blog, that seems painfully accurate. I remember that when I first started them, just as an experiment, I tried to make this pattern in the round with my set of metal double pointed needles (DPNs). While this technique can work with larger sized yarn, it doesn’t work well with crochet thread. The problem I ran into was that the slack between DPNs didn’t get absorbed back into the surrounding stitches as I was knitting. This caused large holes in the sides, which was not aesthetically pleasing. I suppose I will reserve that technique for larger gauge yarns and stick with the regular way of making doll pants. Because that experiment didn’t go well, I made these pants with regular single pointed needles and sewed it together at the end. I found that slipping a stitch at the end makes the edges much easier to work with. I made sure to note that in the pattern, too.

Once I got started with my regular needles, I ran into a few other problems. I finished the first leg, I set it aside, and my daughter found it. As any toddler would, she started waving the needle in the air and pulling at the string, so it was pulled entirely apart by the time I got home. This happened while her father was in charge, but it was ultimately my fault for not putting them somewhere toddler-proof. I had to start it over again after that setback because of how unevenly it had unraveled. Luckily, I didn’t have any other toddler-related incidents after that. I did have a bit of trouble when we were packing and moving, though. At one point, my work was misplaced and I feared it was in a box destined for the moving truck. Luckily, it surfaced before anything happened, but it was frustrating not having it to work on for those days.

These pants used up almost all of the black thread on its skein. I have a few yards left on it when I was finished, but I was worried about running out as I knit the second leg. Luckily, skeins of crochet thread have a deceivingly large amount of thread on them even when they look barren. On that same note, something cool happened just after I finished this garment. I was at a thrift store with my mom and she I found a skein of black yarn! Same gauge that I use for my doll clothes and only cost $1. Forget lottery tickets, my luck guides me to cool thrift store finds. It may be a little thing, but I’ll take it.

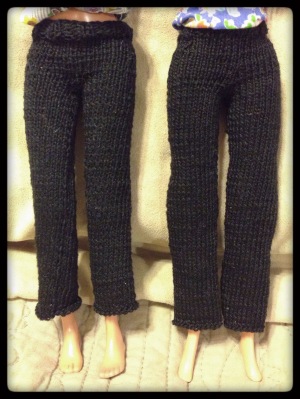
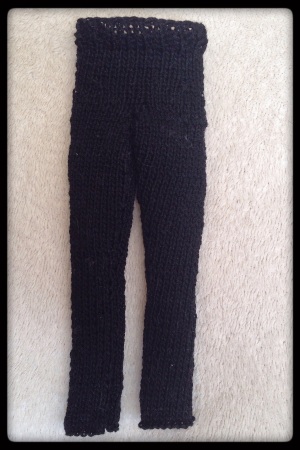
I created the pattern for these pants. I didn’t like the look of various patterns I found online because they were too form fitting, so I had to make the pattern myself to fit the Ood aesthetic. I went for a straight-leg pant that went down to the doll’s ankle. My first draft needed some tweaks, and the adjustments resulted in exactly what I wanted. The biggest changes I did was lengthening the legs and adjusting the rows around the waist. In this picture, the first draft is on the left and the finished product is on the right.

IMG_9242

Here is a link to the pattern. It is a fairly straightforward method, and I hope you enjoy it! I look forward to when I make another pair for the second Ood doll. Before I start on that, though, I am going to make the jacket for this doll. I have been browsing the Sticka till Barbie website, and I found a few promising patterns. I will try my hand at one or two of them and go from there. Once that is done, it is just a matter of making shoes, gloves, and a brain for this Ood to be complete. It seems like a lot more when I write it down. Wow.

IMG_9245

I think she is looking better every day! For me, the biggest difference came when I cut her hair so that the mask would fit better. All she needs is a proper Ood shirt and the whole look will really pull together. Keep an eye out! Next week I will talk about some of the stuff that we found in my mom’s attic. We also just found a box in the basement with some gems, but they may be ruined. Some items were in a plastic box in the basement, and the basement flooded when the water heater broke. The box is covered in mud, but everything inside is relatively clean. The items are dry and not moldy, but they smell terrible. I am going to let them sit out for a week and then I will clean them. From there, I’ll decide if they’re worth keeping or if I have to let go of a fascinating flash from my past. I’m sure I will write about it either way, so we have that going for us. Anyways…. I adore you all and hope you have a fantastic week.

2 Comments

Filed under Barbie Who?

Ood Pants, Take 2

I just finished a knit pair of trousers for one of the Ood dolls to wear. I am tickled pink with how they turned out. Unlike the first pair, they can make it over the shapely hips of the Barbie doll I am transforming into an Ood. They have just enough stretch to get on her, but they’re tight enough that they don’t slide down. They’re exactly what I want for the Ood look.

IMG_8012

I created this with 2.00 mm knitting needles and black size 10 crochet thread. It took about 12 hours to make this, spread out over several weeks. I created the pattern for this myself because the patterns I found online had a tapered legs and I wanted a straight leg for this pair of pants. I also wanted to experiment with the top of the pants, and I am ecstatic with the finished look.

Like any other item I’ve made, it wasn’t always smooth sailing as I created it. Throughout my time knitting this, my cat was being extra cuddly. I had to use a sticky lint roller to de-fluff the pants and the ball (spool? roll? skein?) of thread. I also had to pick out random hairs that had worked their way into stitches with tweezers. It was nice that the cat took a big interest in the project, but it was also frustrating that it added a few extra steps to the process. Also, on no fewer than three separate occasions, I left my work on the couch and my daughter found it. She what any enterprising toddler would do: she started playing with the needles. Luckily she didn’t care much for the thread or the piece itself; she was only interested in the bright red needles. It was cute to see her with them, and at one point it didn’t register to me that she had taken the piece I was creating off of the needle. Luckily she didn’t unravel more than a few stitches each time she did this. I have a hard time getting mad at her for doing that type of thing for a number of reasons, the primary of which is that I am making the clothes for her to enjoy. At this point, playing with the needles gives her more joy than dressing a doll, so I feel obligated to let her have some fun.

Another ‘mistake’ I made was to test out a pair of my bamboo knitting needles on one of the legs. I thought that 2.00 mm needles would be the same regardless of what they are made of. Once again,I was wrong. I knit the first dozen rows of the second leg with carbonated single point knitting needles. The needles had a good feel to them and I enjoyed knitting with them. However, I realized that the bamboo needles work the stitches looser than the aluminum needles I had used for the first leg, so it was noticeably wider than the other leg. I didn’t want to unravel all of my work, so I switched back to the aluminum needles and continued creating the pants. You can’t tell that one leg is wider than the other unless you press them flat; it isn’t very noticeable when the doll is wearing it. Can you see the difference?

IMG_8011

I am not posting the pattern for these knit pants today. I want to make a few alterations before I consider the pattern publishable. Luckily, the changes are fairly minor, so it was easy to write them out (they have to do with sizing and length). I want to make the second pair with the final corrections before I post the pattern just to make sure the changes knit up properly. I do plan on using this pair of pants for one of the finished Ood, so at least you won’t see the blog held up for a week while I make a third pair of pants. I am going to finish the final pair of pants before I move on to another aspect of this doll. There are a variety of things I still need to create for these Ood, and I am trying to tackle them one item at a time.

I haven’t decided wether I want to work on the second Ood mask or the first Ood jacket after I finish the pants. I am fairly certain that I want to cut the hair of both dolls before I start on the Ood mask, and that will be an experience in itself. We shall see what comes next…. Until then, I hope you all have a fantastic day!

4 Comments

Filed under Barbie Who?

Ood Pants, Take 1

In an ongoing attempt to preserve my sanity, I decided to take a break from the Ood mask. I finally finished the main body of it, but I need some time to decompress before I embroider and crochet features onto it. To fill that time, I have been working on a pair of pants for the Ood to wear. It was a fairly simple knit; it only took a few days to complete.

IMG_7772

For this project, I used pattern 967 from the Sticka till Barbie website. I liked this pattern because it looked great on the dolls in their pictures and matched the aesthetic I was going for. I used my new set of 2.00 mm double pointed knitting needles and black size 10 crochet thread to create them. The weird thing about using the tiny new set of needles is that I felt like I would bend them in my hands. They’re just so dainty! They’re made of aluminum, so the chances of me bending them were nil. Still, it seemed like more of a concern with this pair of needles than with the slightly larger plastic 2.25 mm needles I had used to make a pair of pants for Ken. I also believe the stitches are noticeably tighter and just look better than the previous pair of pants I made. It simply amazes me how much the size of needles can affect a finished piece, even when that difference is a fraction of a millimeter.

Overall, using the DPNs was very easy for this project. In fact, it had an advantage over regular needles. When I had to knit the second leg, I kept the first leg on one needle and picked a new needle out of the package to knit the second one. I didn’t have to slide it onto a holder! This saved me a fair amount of time and frustration. With these needles, I rarely had a problem with stitches falling off of either end. I really like these new needles and plan on using them for more projects moving forward.

Even with awesome needles, the actual knitting part was frustrating at times simply because of how tiny everything is. Doing a pearl increase with the dainty needles is the very definition of frustrating. It happened four times, and each time was incredibly hard to get right. I had a minor problem at the beginning of the first leg when I twisted a stitch at the end of a row; luckily it wasn’t noticeable after the piece was sewn together. I also ran into bigger problems towards the end. I forgot to properly secure the final stitch when I first cast off, so while handling the piece I unraveled half of the cast-off row. It was a pain to fix and took over half an hour because I had a terrible time seeing which way I needed to knit/pearl each stitch. Not all of the stitches were straight on the hook, so I had to make sure that I was picking up the correct side of each loop or it would have made the top row look wonky. This was tedious and time consuming. After doing that, I thought it couldn’t get any worse. Oh, how very wrong I was….

Once I finished casting off, I sewed the pants together with a tapestry needle. When I was finished sewing, I realized that I had made a terrible, horrible, no-good, very bad mistake. My cast-off row way too tight. It was so tight that it barely had any stretch to it. I couldn’t easily fix this because I used the loose end to sew from the back of the pants and down one leg – it would take hours to work the end back to the top without ruining the piece. I briefly considered cutting a stitch on the top row and just rejoining a new piece of thread for a looser row, but this seemed dicy. What if I dropped a stitch? What if I cut into the row below? With the sewing already finished, I couldn’t risk ruining the entire piece. I felt like a total novice for not noticing it. I know better than to cast off so tightly, but I think that I was so frustrated from the previous mishap that I let the cast-off get away from me. I tried to stretch the pants, but it was futile. The thread would break before it fit over the hips of either Ood doll. For a moment, it felt like I had put in all that effort for nothing.

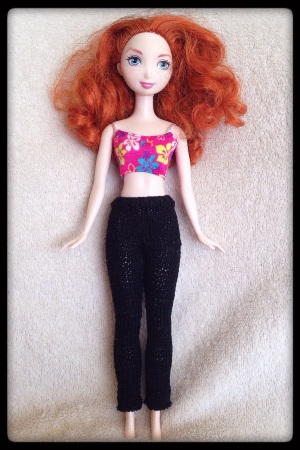
Then I remembered that not every doll has hips like the belly-button type of Barbie. I looked through my dolls, and I was encouraged to find a few that these pants do fit. They fit the Disney Rapunzel and Merida dolls that I have. Both dolls have a smaller body, smaller thighs, and smaller hips than the Barbie dolls. The tight cast-off barely fits over Merida’s thighs, but it is a good fit on her waist once the pants are on her. Rapunzel is slimmer all around, and this causes the pants to try and slip off. I think that they are a better fit for Merida, overall.

IMG_7771

Besides the fact that they don’t fit the Ood dolls, I’m not sure that I like these pants for an Ood. They are right against the skin of the Disney dolls, and I’m sure that they would be snug on the larger Barbie dolls. The pants from the Ood pictures I am basing the dolls on depict a roomier leg, so I may have to make my own pattern. I looked through some of the patterns on the Sticka till Barbie website and they all seemed to be the similar to this pattern of pants with only slight variations – often just the color. I think I will make my own pattern for these pants and post it here on the blog. It will be fun to do a knitting pattern for once! That is the one silver lining from this hot mess of an experience.

That is it. I spent a ridiculous number of hours making a pair of pants that don’t even fit the doll I intended them for. Just my luck! Even with the problems I encountered, I feel good about where I’m taking the Ood. Considering the style, I probably would have made a new pair of pants if they had fit, so it isn’t that big of a loss. Plus, I have a cool new pair of pants for the princess dolls to wear as they blaze new trails. It could have been worse. My next update will be about the Ood mask. I will buckle down and finish the first one over the next few days, and I look forward to sharing the journey.

7 Comments

Filed under Barbie Who?